Friday, August 31, 2012

Catching up

The problem when your hobbies have hobbies is that at some point something has to give. It wasn't enough that I started up sewing again, I had to start a blog to go along with it. I have done quite a bit of sewing over the last month, but not so much with the blogging. Let's see if I can summarize some of what I have done this month . . .

Sewing has really been a boon to my gift-making life. It is far easier to whip up something sewn than something knit. For a four year-old friend of ours, I wanted to borrow an idea I found on Pinterest. I saw these great, but pricey toy mats that converted to a bag that stores the toys. I use one of the great Japanese fabrics in my stash to make a puzzle mat/bag. I made a drawstring casing by finishing the edges with a strip of coordinating fabric. When the mat is open it is big enough to complete a small puzzle on. When you are done you can pull the drawstring closed to make a carrying nap sack.


A project that I have been thinking about for much of the summer was the Sunki dress for my niece's birthday next week. After much consideration, I choose a lovely polka dot from Lecien's Color Basic line as the main fabric and Martha Negley Farmington Feathers in pink for the contrast fabric. The project came together quickly once I had the fabric. The pockets were a bit tricky and I think I would make them a tad deeper next time. I would definitely make this dress again! I also made the leggings. It wasn't the disaster that I feared it would be. I need to work on my technique and hope the Craftsy class on working with knits that I am taking will help me improve. When I do, I am planning leggings for myself in every color I can think of!

Next week my little one will head off to his first away from home care! It's a new program nearby and parents have been helping get set-up. I offered to make several of the things they needed sewn--placemats, napkins, mat sheets, and  aprons. So far I have made a set of six placemats with table setting silhouettes, 12 napkins, and two sleeping mat sheets. I am using fabric that was already in my stash, with a little augmentation from fabric I got at a garage sale ($1 for a shopping bag filled with cottons) and a few yards I picked up at Broken Things for $6. This is just my first round, so I may attempt to put together a couple of tutorials. This project was great for my point system garnering me 6 points!


Wait, what? No Seam Allowance, you might ask. I have been working on some clothes for me, but will have to report in another post. The sewing machine calls.

Monday, August 6, 2012

Made from scratch: Cal Patch study artifact 1

Armed with my measurements, I started my first project for my Cal Patch study as soon as August 1st rolled around. The first project is a basic A-line skirt that will form the basis for (hopefully) endless variations. The project only requires a few measurements: your waist (this doesn't have to be your waist, but where you want the skirt to sit), your widest part (hips or other), the distance between those two points, the length of the skirt, and how wide you want the skirt at the bottom.

When I took my measurements I made two waist measurements, one at my true waist (the smallest part of my waist) and one at my low waist (where I want garments to sit). I determined that a spot just below my belly button was the right spot for my low waist. This spot is personal preference and may change depending on the garment. It may even change during the project, but more on that later.

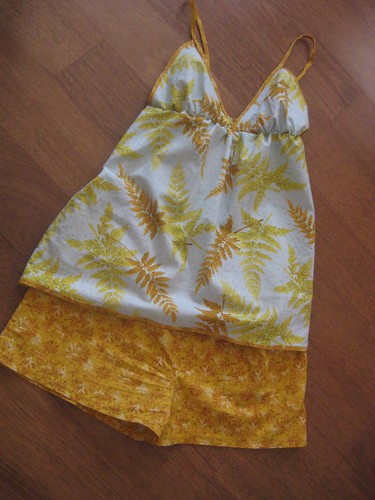
I followed Cal's directions very carefully. I drew lines and moved seams. I turned curves and trued up edges. Within an hour I nearly had the first pattern piece made up. Before things my brain went on the fritz I went to bed. The next day I finished both pattern pieces and prepped my fabric. I wanted to get sewing right away, but the fabric demanded (demanded, I tell you!) that I get a bright pink zipper to go with it, so the project sat for a day or two. Even though this was the muslin I wanted to give it a chance to be a wearable garment. Now wearable is in the eye of the beholder. The fabric itself was a $2 piece of lightweight canvas or linen with a very. loud. neon. print. I figured that if it worked out it could be an exciting skirt for a dreary day or even a sunny day.

At this point I had spent somewhere around three hours on this project. It might have been less, but I made an error in judgement when drafting the pattern pieces. Recently, I bought a Seam Allowance guide to aid me in adding seam allowance to Japanese patterns, so instead of adding the seam allowance to my pattern I thought I would just use this to cut it out. As it turns out I couldn't quite get the hang of it. Instead of fiddling with it even longer than I had been I laid out the pattern pieces and traced the shape adding the seam allowance as I went along. This also meant I had to work on the darts a little. Lesson learned, I will add the seam allowance next time!

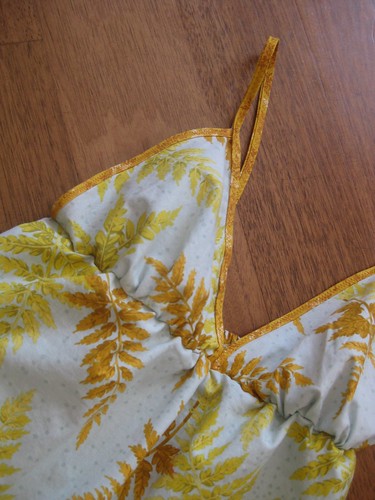
I got my pink zipper and immediately got to work following the advice I read about muslins: baste! I basted the darts, got the zipper in and basted the seams. Voila! My muslin was ready to try on! The first thing I noticed was that I wasn't crazy about the waist both in terms of location and fit. The location was off by an inch or so. I actually like the skirt to cover my navel--ending right at the top edge of my belly button--which is much smaller and higher than where I had originally placed it. Cal has you work in some ease, but even if I had the skirt sit below my navel there was too much ease for me.

Since everything was basted, nothing was permanent so I went back and redrew the hip curve on the inside of the skirt. I moved the seams in 3/4" inch at the top. I also changed the distance between my smallest and largest points as I was moving the waist up. Baste! Baste! Tried it on again and it was still too big, so I moved it in another 1/2". This time I tried it on and it was perfect. I went over the seams, zipper, and darts with a regular stitch. I finished the waist with some bright pink bias tape and hemmed it. I now have a brand-new skirt made from scratch! I still want to add a patch pocket, probably just one though. This style skirt on me wouldn't take a side seam pocket very well.

I could add the changes to the existing pattern, but I think it will be a useful exercise for me to redraft the pattern using the new waist measurements. 

Helpful reminders for next time:
(1) Take the time to add the seam allowance!
(2) I noticed a funny little bump in the center front of the finished skirt. I don't think I did a great job truing up and checking for 90 degree angles. This was also evident at the hem.
(3) Since I know what I want my finished measurement to be I will not be adding in ease.

 Except for when I slept, I have been wearing this skirt since the moment it came off the sewing machine yesterday. I love it! I deem this a tremendous success. I can't wait to make another one (after a second muslin) from some printed linen I have been eying at Verb since the beginning of the summer!


Saturday, July 28, 2012

Flag of the picnic nation

I have been lucky enough to live in two cities that have thrift stores that focus on reusing materials for art, craft, and learning. In San Francisco there is the amazing SCRAP and here in Oakland we have the East Bay Depot for Creative Reuse or as we call it in my house, Broken Things. SCRAP is a much more dangerous place to go as most things that I am interested in--fabric, yarn, and paper goods are typically sold at a per bag price (last time I remember this was $7 for a grocery bag filled with items) though some are by the yard or lot or piece. All this to say, it is super cheap. During a time of incredible fabric stash enhancement in the early 2000s, I grabbed lots and lots of large fabric swatches. Over the years many of these swatches probably made their way back to SCRAP, but there were a number that I couldn't part with.

For some time I have been intending to take these two sets of pretty florals in similar tones and make a quilt. One idea had been to match them up with the fabric I recently used on my summer PJs, but when my mom passed along three different Echino oil cloth fabrics to me I decided to make picnic/park blanket. With the oil cloth on one side I could put the blanket down on damp grass without worrying about getting wet or having to completely launder the blanket after every use.

The front is a simple patch work of the nine swatches that made a square of roughly 43" by 43". I had about the same size piece of oilcloth that I had cut out a piece to make a wipe-able seat cover for a dining room chair. To fill in the gap I used a piece from another Echino oilcloth. The result looks like a very hip version of the American flag. I used store-bought quilt binding and the leftovers made the tie to wrap it up for portability. I rounded down for this project to get three points (1 point each for patchwork, backing, and quilting). I am looking forward to using this on an excursion to Totland or for a picnic!

Friday, July 27, 2012

Numbers game

When I finished the batch of sewn gifts I hit another 20 point milestone. When I first conceived of this project my hope was to use one yard a week, but because of the efficiency of sewing (and my current obsession) it is pretty easy to exceed that. So the numbers are:
  • Rollover from last batch = 4pts
  • New seat covers = 2.5pts. Technically this is not a sewing project, but it involved fabric leaving the sewing room so it counts. I calculated the amount of fabric used by figuring out the area of each seat and multiplying it by 3 -- for the burlap on the bottom, the layer of batting, and the exterior fabric. Then I divided that number by the area of one yard of fabric. This was an epic project. The chairs look great, but it took a long time and the difference from the earlier recovering jobs to the most recently completed one is vast.
  • Sunhat Disaster 2: The mother of all hat disasters = 1pt
  • Stuffy repair = 1pt. I made several repairs to my son's stuffed animal collection. New eyes for Mama Bear, some stitches for his alligator, etc. Alligator had been hanging out in the sewing room for months now, so I am happy that she is out.
  • Backpack for L = 1pt
  • Wiksten tanks = 2pts
  • Backpacks for E & L =1pt 
  • Little girl backpack = 1pt
  • Backpack for Cy = 1pt 
  • Backpack for A = 1pt
  • Summer PJs for me = 2pts 
  • Wiksten 3 for Mylinda = 1pt 
  • Sleep shorts for mom = 1pt 
  • Playday dresses = 2pts
  • Boxers for brother = 1pt 
Total points: 22.5pts

There will be no prize for me this time because, frankly, I have not been refraining from purchases. It is very hard to resist discounted remnants, people!! Or pretty voile for a future pair of bloomers. Or cheap, cheap yardage at the thrift store. It's a good thing I am on a sewing kick otherwise my craft room would be even more crowded than it is!

Wednesday, July 18, 2012

Cal Patch study

One of my goals for the Seam Allowance project is to finally work my way through Cal Patch's Design-it-Yourself Clothes. I bought this book right after it came out with the best of intentions. Jenny and I kept saying that we were going to make a date to take our measurements. We never did. Periodically I would take the book out and flip through it, but I never committed to reading it or working through the exercise of making a pattern. As part of Seam Allowance I am making myself a schedule so that by the end of the year I will have made myself the basic pattern for each garment type and have attempted a variation. The schedule looks like this:

July 2012: Read part one of the book and take full set of measurements.

Cal suggests that you work as you read and I will certainly do that. However, I am approaching her book as a textbook and this as a self-guided course, so this month I will also read the instructions for the each of the basic patterns and browse part three about customizing and stylizing.

August 2012: Basic skirt pattern

September 2012: Skirt variation, either from the book or of my own design.

October 2012: Basic T

November 2012: T variation, either from the book or of my own design.

December 2012: Basic woven shirt

January 2013: Woven shirt variation, either from the book or of my own design.

February 2013: Basic dress

March 2013: Dress variation, either from the book or of my own design.

April 2013: Basic pant

May 2013: Pant variation, either from the book or of my own design.

Anyone interested in joining me? I would love to exchange ideas with others engaged in the same study and see what others create. No one is obligated to follow along for every single month (maybe you don't wear woven tops and you're not a skirt woman, that's cool). Or perhaps you just want to do the basic patterns. Check out this Flickr group for inspiration! Comment below and leave your blog address or Flickr ID if you want to work alongside me.

Sunday, July 15, 2012

Sew unto others

Although I have just committed myself to making one quarter of my wardrobe, the last five things I have sewn have been for other people. It's good practice--both in the sense that I every stitch I sew brings me closer to proficiency and in that giving people items that you make is a good thing.

When I decided to start this blog I wanted to have a unique illustration for the header so I turned to one of my two renaissance sisters-in-law, this one being the wife of my brother (I will certainly talk about the other, the sister of my husband, at some point, too). Mylinda is an actress, singer, and dancer. She is also a visual artist, who works in pen and watercolor. I told her about this blog and its intention and, seriously, within hours she had created the amazing illustration you see above. As a thank you I wanted to make her something, so I turned to my new old friend, the Wiksten Tank. For this version I used my re-drafted pattern, left off the pocket, and lengthened it to 25" from under the arm to make it more of a tunic, but not quite a dress. This fabric was intended to be the muslin of the Darling Ranges dress, but in a washing mishap some of the yardage was lost. I think it looks great as this top and am excited to see how it fits.

Early last week, my mom came to visit and asked for a pair of sleep shorts like the ones I'd made myself. Using the pattern/recipe from the original One Yard Wonders I drafted a pattern for mom and managed to finish them before she left. These came out so much better than my first attempt. Unfortunately I forgot to snap a photo of them, but I used the same fabric as above.

Since I was mailing something to Mylinda, I decided to whip up a couple of little dresses for my nieces. I've tagged several projects in the new One Yard Wonders (OYW) and started with the Playday Frock. The smaller size is made in a darker orange quilting calico and the larger size is made in a white, orange, yellow, and brown vintage sheet. This is a cute pattern that is easy to sew up. I am a little unsure that it will be sufficient in length, especially for my older niece. I think that if it is too short it should work as a top and look really sweet with pants, leggings, or even shorts.

I didn't want to leave out my brother, so I sewed up one more project from the new OYW. Men's boxer shorts. They were basically like the sleep shorts and PJ bottoms that I have made, but with the complication of a fly. The directions in the book did not make sense to me (which is not to say they don't make sense, just I wasn't getting them) and I couldn't find anything useful online. Ultimately, I looked at a pair of John's boxers and realized that there was something wrong with the amount of overlap. Now this could have had something to do with that I made French seams so I may not have had the right amount of fabric to make overlap just right. That said, they look sharp and should work.

I got some practice at French seams, elastic, pattern adjusting, and being at the machine. I also got five points--one for each project!

Sunday, July 1, 2012

Seam Allowance

Ring pincushion made by my mom!
I got my first sewing machine about 13 years ago after a demoralizing trip to the mall. I was shopping for clothes and as I went from store to store I realized that everything looked the same, nothing was particularly well-made, nor did it fit me properly, and the ethics of clothing industry were pretty terrible. That was it, I was going to get a sewing machine and make my own clothes.

I was pretty much starting from scratch so I took classes at first for the basics. I made purses, bathrobes, pajama bottoms, and inexplicably several pillows that were faux fur on one side and satin on the other. I moved on from there and started coming up with my own bag patterns. I made a pair of pants. I made lots of skirts (both with elastic waists and zippers). I made a couple of dresses. In short, I was pretty good at sewing, but never felt like I was.

When I thought of sewing I thought of mistakes, swearing, and the awful tension problems of my original machine. At the time, resources on the internet were not what they are today, so there were fewer places to turn in my frustration. Instead of working through the frustration I would stop sewing. When I would come back to sewing I would have to restart my learning.

This time I am having to relearn, but I feel less frustrated by my mistakes. I take a lot of deep breaths and pick up the seam ripper. After years of knitting, I realize that I even with the mistakes that I make sewing still moves faster and how fast do I need to get stuff done. This is what I do as a hobby!

That said, I am ready to take this hobby and make a commitment. I am coming back to the original intention of why I learned to sew and have joined the Seam Allowance pledge to make at least 25% of my wardrobe. I have some ideas about what that means to me and will explore that more on this blog. Today I went to the kick-off party for Seam Allowance and was excited to see how many people had signed on. It was also fun to see how many people there had not taken the pledge, but were definitely toying with it, asking questions, shopping for fabric.

Friday, June 15, 2012

Summer PJs

I bought the original One Yard Wonders as soon as it came out and regularly combed through the patterns for the ones that I wanted to make. However, until recently I had not made a single pattern. Earlier this year I made two versions of the yoga mat bag--one mostly as written (including the erroneous instruction for the base to be 16.5 inches in diameter) and one with a few changes (a pocket, placement of the strap). In planning my next projects I came across the 101 One Yard Wonders Sew Along at Pink Chalk Studios, which made me look at some of the patterns differently and offered insight into the projects. I liked the idea of the Perfect Fit Sleep Shorts paired with the Summer Nightie since I am more of a shorts sleeper than a nightie sleeper.

The instructions for drafting the shorts are fairly straight-forward, although I was not 100% sure what the rise was (the distance from the waist to the crotch seam--different on the front and the back) or if I was measuring it correctly. The resulting pattern is a little boxy, but it works. It would have worked better if I had paid more attention when laying out the pattern pieces as I ended up with two of the same front pieces instead of mirror images. This problem was compounded when I assumed I had cut the back piece incorrectly and corrected that piece by adding on the crotch piece. Then when I sewed my leg together I ended up with two of the same legs! To fix that problem I sewed the legs together with the crotch seam not aligned and adjusted to make the pieces even out. The result looks and fits fine, but it could be better. I sewed a little button on the front so I would know which side I intended to be the front.

Next time I will add a curve to the back pieces for a better fit and lower the waist as I typically don't wear my PJs at my natural waist.

Using a coordinating fabric I then made the Summer Nightie using fabric from the shorts as bias tape. This came out super cute and I didn't have too many problems following the directions for drafting the skirt of the nightie. A couple of words of advice:
  • If you are going to wear this as a nightie, you might want to add a few inches to the bottom. You may not be able to do this with one yard so consider using coordinating fabrics or using a larger piece of fabric from your stash.
  • The triangles for the top are pretty small. I am a B cup, maybe a B+, and I cut out the largest size. It works, but next time I might make the triangles a bit bigger. Size up! If you are bustier, you can easily trace the triangles larger.
  • The casing instructions are fiddly. I would recommend either making the casing first, then sewing the triangles to the top or sizing the front down to fit your underbust size and shirring the back.
I plan on using the shorts pattern as a basis for making full-length PJ bottoms with the above adjustments. If I make the nightie again I might actually make it shorter to make it more of a top.

Wednesday, June 13, 2012

Wiksten squared

There's been radio silence the past few weeks as the school year has wound down, but my sewing machine has continued to hum. At the end of every year, when the testing is done, the art history class holds an event dubbed the Art History Olympics, a contest of intellectual prowess and artistic interpretation. Among the competitions are building famous pieces of architecture from memory using graham crackers, marshmallows, and cruciferous vegetables; The Price is Right with recently sold famous works of art; and an art fashion show where students act out pieces of art.

As I have been joining an esteemed panel of judges (other teachers) for a few years now, I decided this year I would join in with an art themed outfit. Since I had been obsessed with Jay McCarroll's Drop Cloth fabric from his Habitat line and stalking the Wiksten tank obsessively, I thought I would combine the two. I decided this with less than a week to make the top and I knew that I would have to, for the first time in my sewing life, make a muslin.

Armed with the knowledge mined from Flickr, I knew to cut out the size that matched my bust so I cut out the medium size using a recycled sheet (this sheet is endless, yo, I cannot get rid of this fabric). The initial result looked good, but needed some tweaking. I went and paid a visit to A Verb for Keeping Warm, where Kristine suggested that I take up the straps so that the seam fell behind my ears and for the excess fabric I was getting on the back neck I should take the back down a smidge. AVFKW had the Drop Cloth fabric in blue, which is exactly what I wanted, so I got 1.75 yards.

I got home, took up the straps and lowered the back. I liked it better, so I bound the neck as practice. One other thing that bothered me was how it sat on my backside. It sort of rode up, so I wanted to widen the bottom a little. I then transferred the following alterations to the pattern and redrafted it:
  • Trim .5 inch off front strap
  • Trim 1 inch off back strap & neck
  • Grade back down another .5 at deepest
  • Increase back sides by .5 inches starting at 7 inches from the bottom
  • Cut neck and armhole binding down by 1.5 
I cut out the pattern pieces on Monday night, sewed Tuesday night and early Wednesday morning et voila! I had something to wear to the Art History Olympics and a wearable muslin. 

I did end up cutting the neck down a smidge more, which is useful information since I just cut out fabric for a third Wiksten that will have a button band down the back and have two pockets on the bottom of the tank instead of one at the top. While this pattern seems simple, it is a great base to start from and a perfect pattern to practice making alterations with. I also think it could be a great gift if you have the general idea what size someone is especially since it works up super fast!


Sunday, May 27, 2012

The long thrift

Thrifted fabric is both a blessing and a curse. When my friend's two year-old son was obsessed with trains I found this canvas with trains, train line logos, and other old-y fashioned-y train related images. Perfect! I would make him a backpack with a matching lunch bag. Shoot. I had so much fabric (for a mere $3.99) I could probably make him some funky train pants! It was going to be great. Fast forward to today and that kid is eight and no longer interested in trains.


Luckily I have my own train-loving two year old now. And he has a number of training-loving little buddies. This weekend we were scheduled to go to a double second birthday party. We had purchased two of our favorite books by David Shannon and going off my last post I decided to make gift backpacks. I wanted to make these a little faster, so I didn't do all the details from the last project. I also wasn't as diligent when working out the numbers. I wanted to make them big enough to fit the larger size hardcover books. These do, but just barely. I had wanted to make French seams (my new favorite sewing trick), but I miscalculated all over the place and ended up with no French seams. On the side seams I had to make quarter inch seams and zig-zag stitch over the seam allowance. On the bottom I had done the first step of the French seam before I realized I wouldn't have enough fabric, so I made seam bindings and covered up the exposed seam. It all turned out fine. Instead of a flap like in last week's effort, these have Velcro closures. Instead of fabric straps, I used webbing with d-rings. Oh, and I didn't line these bags. They really were quickies, so I am counting them as 1pt total.


Next time I make one of these my plan is to make a gusset so it can hold more than a single skinny book, perhaps a snack and a couple of toys along with the skinny book. My kid needs a backpack of his own, too. I have pieces cut out for one of these in the same fabric, but haven't had the fortitude to start sewing.

Tuesday, May 22, 2012

A little something

As an auxiliary wedding vow, I promised John that I would stop buying wrapping paper. It was a good vow. Wrapping paper is terrible for the environment and a waste of money. I could use up what I had or reuse what I received. For a while when I wasn't sewing I did use scraps and fat quarters to wrap gifts, but recently I realized I could make a vessel for a gift that could be used afterwards!

When I knew I was going to see an old friend and his 20 month old daughter last weekend, I ordered up a favorite Elephant & Piggie book and set to work on a little backpack inspired by this backpack, a tutorial from Chickpea Studios (scroll to the bottom of the page). Instead of using old jeans, I used some Japanese linen for the exterior. The original wasn't lined, but I used a heavy weight cotton to line my version. This also provided some interest to the cute, but fairly neutral linen. I have a few more toddler books to give in the coming weeks so I am planning on making more. When I do I will document the modifications that I made here.

In the meantime, here are shots of the inside flap and the back (and a point for me!).

Thursday, May 17, 2012

Remind me . . .

Pretty Japanese linen
. . . not to go into millinery. A few weeks ago I came across this endorsement of a sunhat pattern from the book,  Craft Challenge: Dozens of Ways to Repurpose a Pillowcase and thought it might be the perfect pattern for this beautiful Japanese floral linen I have been holding onto for many years. I checked the book out from the library and that was where my troubles began. The first thing I had to do was enlarge the pattern pieces 400%. This never works out for me, but the price was right (free) so I spent some time at the copier one afternoon. I never got a full pattern piece, but figured I could manage. I figured wrong.

It looks wearable, but . . .
The next issue came when I cut out the wrong size for the band of the hat and compensated by cutting out a larger size piece for the back of the band. This resulted in the crown piece (which seemed small, did I really blow up those pieces 400%?) not fitting. To top it off, I am not really sure what size piece I cut out for the brim. Yikes. This was a disaster! Thank goodness I was not using the precious linen and instead chose to start with a remnant of heavy brown linen that I picked up at SCRAP.

Lessons learned:
. . .wonky.
  1. Muslins are NOT a waste of time, especially when you have no idea what you are doing.
  2. That thick linen frays like the dickens. Does all linen do this?
  3. If the crown piece looks too small, it probably is too small.
  4. My head is bigger than I think it is.
I am counting this project as done and throwing it in with my kid's toys. One point earned.
No, seriously, it's sewn like that

Monday, May 14, 2012

In which I do the numbers

 It is time to do the numbers because I have achieved my first 20 points! It has only been a few weeks since I conceived of this project, but I am counting projects since the beginning of this year when I vowed to dump my stash. The first three projects were pre-proclamation. The rest were since mid-April.
  • Curtains for the neighbors. This project was not from my stash, but that bag lingered in my sewing room long enough to count. I have no idea of the yardage = 1pt
  • Matching PJs for my friend and her daughter = 2.5pts
  • Yoga mat bag for my MIL = 1pt
  • 2 little pouches for 2 little girls = 1pt
  • Yoga mat bag for me = 1pt
  • Dress N from Stylish Dress book = 2pts
  • Fixed cute sweater I bought second hand with a split sleeve seam* = 1pt
  • Fixed grey shirt where I took out the side tag and split the seam* = 1pt
  • Hemmed green cords that I bought second hand over a year ago* = 1pt
  • Hand "blind-hemmed" door skirt = 1pt
  • Sunglass case disaster learning experience = 1pt
  • Tiny boy sunhat = 1pt 
  • The long suffering duvet* = 9.5pts 
    Darling Ranges pattern by Megan Neilsen
Total=24 points! 


With these projects I added five articles of clothing in or back in to my wardrobe, I made five gifts, and learned that screw-ups are important sewing lessons. Plus, I got to reward myself!

A few weeks ago A Verb for Keeping Warm's Kristine and I talked sewing for a long time. I went on and on about the rage around the Darling Ranges dress by Megan Neilsen. When I went back in the other day, she had started carrying Megan's patterns. I knew immediately what my reward would be! I can't wait to start planning my Darling Ranges.

*I moved all of these mending/alteration projects from my old house! 

Sunday, May 13, 2012

Useful is the new glamorous

In my sewing dream world, I make clothes. I make clothes for me and they all fit well and make me look effortlessly stylish. In this fantasy life whenever I wear something that perfectly suits me, of course, I have made it because if it were purchased at Target it would not fit so well or be that perfect shade of plumeuse (yes, I did just make a smoosh name of my two favorite colors).

But in this life, my real life, sewing is most often utilitarian. But this is not disappointing to me -- sewing for utility is a great thing. It makes me feel self-sufficient, it prolongs the life of useful objects, it saves money, and is fulfilling, if not as glamorous as making my whole wardrobe. With that said, it is gratifying to present you with my long-awaited duvet cover. For you this wait has been mere seconds, but for me it has been so long since I started this project that I can only guess that it has been five or six years. To say that it has been longer would be too shameful.

Back in the last decade, we bought a nice duvet for the cold winters in our old apartment. I have a terrible allergy to down, so we purchased a synthetic one that is truly as warm as down. I insisted that we did not need to spend the extra money on a cover and that I would make one. I started out strong by quickly purchasing some bedding on clearance to repurpose into a duvet. I measured it out, sewed a border on what would be the underside to make the two sides the same size, and then I abandoned it. I folded up the ten or so yards of fabric and shoved them in with the rest of my fabric. Case closed.

A couple of weeks ago I moved something in my sewing room and uncovered this unfinished cover. All these years our duvet has been exposed and really not that appealing. I still liked the main fabric for the cover, maybe even more as the yellow and green fit with the fabric I have to make curtains for our bedroom. I set to work and after a few nights and a couple of afternoons our bed is looking better (I will do something about those pillow shams eventually).

The last time I had a duvet cover made like this (back when I would get my mom to do sewing projects) one of the things that drove me crazy was that the duvet would slide down inside the cover. This time I bought some snap tape and sewed two snaps at five places inside along the top seam. I matched those places up and sewed the other side of the snap tape to the comforter. So far no slipping duvet! My seams might not match, but I do think I am already improving a bit.

Saturday, May 12, 2012

The point system

I am a woman motivated by incentives. Plus, as a librarian, I like to categorize and sort things. This started at a very young age, when I divided up my Grandpa's rock collection by color and subdivided by size until everything was sorted out and assigned (not joking) a Family and Species name that I had made up.

When facing my fabric stash I knew that I could not sew just for the sake of working down my fabric stash. I knew that I couldn't even just sew for the sake of becoming a better seamstress.There had to be a built in reward system. I had to get something for all my hard work. And on another level I wanted to improve my fabric stash. It is filled with a mish mash of quilting fabric, scraps from SCRAP, upholstery weight, flannel, fake fur (!!!), oil cloth . . . the list goes on. However, if I wanted to make a solid color dress or really a solid color anything I would have the choice of a yard of red cotton poly blend or that black heavy wool coating I got super cheap to make a cape out of. Yes, a cape. This was before capes were cool.

My first idea was to get 52 projects/yards out of my stash. Why 52? I was thinking that 1 a week was a decent goal and that I would take a year with this project. At every quarter or 13 projects/yards I would get a reward of some sort like a pattern or fabric. This was a good idea, but I realized was a little like binge dieting. I might get the first wave of fabric out of my stash, but then what? Would I just gain it all back?

I knew I needed something sustainable, so I decided that for every 20 points I will get a reward. This way I would be motivated to keep sewing, to up the ante, to explore and not just acquire. My hope is that this will help me grow as a seamstress, build pieces that I am excited about into my wardrobe and have a reasonable, usable stash at some point.

Points are defined as follows:
  • Any project that uses under 2 yards of fabric=1 point. I figure the projects that take under a yard will balance out with those that take just over or close to 2 yards. No fractions in this area.
  • Projects over 2 yards = 2pts + actual yardage over 2 yards in half yard increments (rounded in mathematical terms). This is not as convoluted as it sounds. A project that takes 2.25 would get 2 points, a project that takes 2.75 yards would get 3pts, but a project somewhere in the middle of those numbers would get 2.5. Again, it would all balance out at some point.
  • Mending, alterations, redesigns=1 point for each project that gets out of my sewing space and into my wardrobe.
  • Donated fabric=Half of actual yardage in points. For example, two yards given away would equal one point. This will encourage me to use fabric rather than dump it, but also encourage me to part with fabric that I know that I am not going to use. I will have to have a substantial amount to give away at once to make it worth it.
I will likely reference this system from time to time when I am posting about projects, but at 20 point markers I will post an accounting along with the reward. Coming soon . . .

Tuesday, May 8, 2012

MMMay

Being new to sewing blog scene I have just caught on to Me-Made-May. While I don't think that my sewing output could clothe me for long, I do have my knitting to add to the mix. Since weather in the Bay Area can shift from warm to cool to cold within an hour I might be able to wear something handmade every day this month (with repeats, of course).

A third life!
Today is May 8th and I am wearing my door skirt. This skirt started its life as a highly gathered small waisted circle style skirt that I bought at Goodwill many years ago. At the time I had just taken an A-line skirt class and made a simple skirt with waist-facing and an invisible zipper, so I harvested this awesome fabric to make another. I took off the waistband, washed the fabric, ironed it and cut out the pieces to preserve the original blind hem. The result was vaguely cute, but honestly the waist was too low and it was way too long. I wore it once and awhile, but eventually it went back to the sewing room to be harvested for something new. A few weeks ago I tried it on to see what could be done with it. On my post-baby body the skirt fit at my natural waist, but was still too long (apparently I had grown around the middle, but failed to get any taller) so I sucked it up and re-hemmed by hand in an attempt to make a blind hem. The hem is so-so, but the skirt is much cuter and will be worn more often! Plus it was one point towards my stashdown efforts.

As it turns out without even trying I had been participating in MMM for a few days:
  • May 7th: One of my five-minute skirts 
  • May 6th: Dress N from Stylish Dress Book (picture to come)
  • May 5th: the Penumbra T 
  • May 4th: not exactly true to the spirit, but I wore a pair of pants I've had for over a year and finally hemmed last week, so it feels like I made them (plus I got a point since they were out of the sewing room). Beyond that I can't remember what I wore, but not bad for unintentional participation.

Practice makes . . .

Over the weekend I decided to tackle a long unfinished project that would result in more than nine yards exiting my fabric stash. Some years ago I planned and purchased fabric for a duvet for our warm, but white, comforter. The fabric,actually sheets and a repurposed duvet for a twin bed,was cut and sized, but never sewn. So this weekend I double-checked the sizing and sewed three sides. I decided to finish the bottom with Velcro, but only had two yards and needed three. A trip to Discount Fabrics was fruitless as they only had the soft half (is there a proper name for this?)of the size Velcro I needed, so I am left hanging. Thanks to Adrienne at A Verb for Keeping Warm I have an idea for finishing! More on the duvet and my trip to Verb soon.

To have something to show for myself I decided to tackle two small projects yesterday. The first was a case for my new cheapo sunglasses in hopes of limiting the number of scratches and extending their lifespan. How hard could this be, I thought. When I couldn't (and still can't) find my nice sewing shears I should have recognized it as an omen, turned back and spent the afternoon cleaning my sewing room so I could find them, but no. I started with a 7.5" x 9" piece of fabric and backed it with a piece of quilt batting. I busted out my trusty walking foot and decided to experiment with some freeform quilting. Turns out that though it wasn't pretty, it also was easier than I thought it would be. Hurray!

Loose threads, the sign of a true perfectionist!
The next step was to line it with some fleece to make it soft inside. I wanted this to be quick and easy so decided that exposed seams would be fine. I sewed the sides together and popped it right side out, but the fleece was too bulky. I could fit my sunglasses in, but it didn't look pretty. I forged ahead and decided that if I could get the bias tape around the edge I could lock down the fleece and live with the bulk. Well, turns out that the bias tape could not reach around all the layers. I tried to sew two lengths of it together. Still nope. F-it, I thought, I turned the piece inside out and using some old crappy paper scissor I cut out the lining. I turned down the raw edge, sewed the Franken-tape over the edge and SCENE. The result is not pretty, but it is functional. I will definitely try this again and rethink the size and lining issues. In the meantime 1 point towards my stash down!

Since I wasn't feeling the rush of victory I decided to mush on, as my Gram would have said, and sew up this adorable hat for my little guy. I had the pieces cut out, so I was sure to finish it quickly. I did and it would be absolutely perfect if he was 9 months old, which he's not. He is over two and has a big head (20+ inches!), so into the gift pile it goes. Let me say there was nothing wrong with the tutorial. I just miscalculated and didn't account for the seam allowance in my crown piece. Here is the finished product and I hope to make another before the end of the week.

Small hat, outside and in


Sunday, May 6, 2012

Sew far to go

Welcome to Yards to Go, the blog documenting my sewing exploits. If you have come here from my knitting podcast, Stash and Burn, thanks for visiting!

I started sewing sometime in the late 1990s on a used Singer sewing machine that gave me nothing but trouble. At the time I made lots of purses, bags, and started making clothes. A few years later I got a lovely Bernina, which sews beautifully, but it got some direct competition from knitting, which I picked up in 2002. Over the years, my interest in sewing has waxed and waned, but my interest in acquiring fabric did not. Going into a fabric store usually resulted in taking something out with me. Occasionally I have gone through the stash and carted bags and bags away, but when I moved last fall I still brought more than eight good-sized containers with me.

Yikes.

At the beginning of this year, I felt completely overwhelmed and resolved to just get rid of it all. That was it. I was done. I had been sewing on and off for years and I didn't feel like I was improving or that the process was getting easier. It just felt like I had a lot of fabric. At the same time could I really just get rid of it all?

The weather started to warm up and I started thinking about sewing dresses. Visions new curtains danced in my head. Maybe I could make stroller bags out of that cute Japanese linen. And another line of thinking came about.

Perhaps if I pushed myself to sew more often, I would get better. The process would feel less daunting. And maybe I could even make more of my clothes. So I started trolling sewing blogs and decided to give it a try with one catch: I have to use the fabric that I already own.

I decided to start this blog for two reasons. One, to have a place to document the use of my stash. I hope over time to reduce what I have by more than half. To have a manageable stash of fabric that allows for me to purchase for projects that I want to make. Two, I get so much from the online sewing community--tutorials for projects, ideas for patterns, and reviews and hints on patterns that I am making--that I thought I should contribute by sharing what I am learning in the process.

My plan is for this to be a sewing blog, but I am an avid knitter so I will probably feature a bit of knitting along the way.