Showing posts with label clothes. Show all posts

Monday, August 6, 2012

Made from scratch: Cal Patch study artifact 1

Armed with my measurements, I started my first project for my Cal Patch study as soon as August 1st rolled around. The first project is a basic A-line skirt that will form the basis for (hopefully) endless variations. The project only requires a few measurements: your waist (this doesn't have to be your waist, but where you want the skirt to sit), your widest part (hips or other), the distance between those two points, the length of the skirt, and how wide you want the skirt at the bottom.

When I took my measurements I made two waist measurements, one at my true waist (the smallest part of my waist) and one at my low waist (where I want garments to sit). I determined that a spot just below my belly button was the right spot for my low waist. This spot is personal preference and may change depending on the garment. It may even change during the project, but more on that later.

I followed Cal's directions very carefully. I drew lines and moved seams. I turned curves and trued up edges. Within an hour I nearly had the first pattern piece made up. Before things my brain went on the fritz I went to bed. The next day I finished both pattern pieces and prepped my fabric. I wanted to get sewing right away, but the fabric demanded (demanded, I tell you!) that I get a bright pink zipper to go with it, so the project sat for a day or two. Even though this was the muslin I wanted to give it a chance to be a wearable garment. Now wearable is in the eye of the beholder. The fabric itself was a $2 piece of lightweight canvas or linen with a very. loud. neon. print. I figured that if it worked out it could be an exciting skirt for a dreary day or even a sunny day.

At this point I had spent somewhere around three hours on this project. It might have been less, but I made an error in judgement when drafting the pattern pieces. Recently, I bought a Seam Allowance guide to aid me in adding seam allowance to Japanese patterns, so instead of adding the seam allowance to my pattern I thought I would just use this to cut it out. As it turns out I couldn't quite get the hang of it. Instead of fiddling with it even longer than I had been I laid out the pattern pieces and traced the shape adding the seam allowance as I went along. This also meant I had to work on the darts a little. Lesson learned, I will add the seam allowance next time!

I got my pink zipper and immediately got to work following the advice I read about muslins: baste! I basted the darts, got the zipper in and basted the seams. Voila! My muslin was ready to try on! The first thing I noticed was that I wasn't crazy about the waist both in terms of location and fit. The location was off by an inch or so. I actually like the skirt to cover my navel--ending right at the top edge of my belly button--which is much smaller and higher than where I had originally placed it. Cal has you work in some ease, but even if I had the skirt sit below my navel there was too much ease for me.

Since everything was basted, nothing was permanent so I went back and redrew the hip curve on the inside of the skirt. I moved the seams in 3/4" inch at the top. I also changed the distance between my smallest and largest points as I was moving the waist up. Baste! Baste! Tried it on again and it was still too big, so I moved it in another 1/2". This time I tried it on and it was perfect. I went over the seams, zipper, and darts with a regular stitch. I finished the waist with some bright pink bias tape and hemmed it. I now have a brand-new skirt made from scratch! I still want to add a patch pocket, probably just one though. This style skirt on me wouldn't take a side seam pocket very well.

I could add the changes to the existing pattern, but I think it will be a useful exercise for me to redraft the pattern using the new waist measurements. 

Helpful reminders for next time:
(1) Take the time to add the seam allowance!
(2) I noticed a funny little bump in the center front of the finished skirt. I don't think I did a great job truing up and checking for 90 degree angles. This was also evident at the hem.
(3) Since I know what I want my finished measurement to be I will not be adding in ease.

 Except for when I slept, I have been wearing this skirt since the moment it came off the sewing machine yesterday. I love it! I deem this a tremendous success. I can't wait to make another one (after a second muslin) from some printed linen I have been eying at Verb since the beginning of the summer!


Wednesday, July 18, 2012

Cal Patch study

One of my goals for the Seam Allowance project is to finally work my way through Cal Patch's Design-it-Yourself Clothes. I bought this book right after it came out with the best of intentions. Jenny and I kept saying that we were going to make a date to take our measurements. We never did. Periodically I would take the book out and flip through it, but I never committed to reading it or working through the exercise of making a pattern. As part of Seam Allowance I am making myself a schedule so that by the end of the year I will have made myself the basic pattern for each garment type and have attempted a variation. The schedule looks like this:

July 2012: Read part one of the book and take full set of measurements.

Cal suggests that you work as you read and I will certainly do that. However, I am approaching her book as a textbook and this as a self-guided course, so this month I will also read the instructions for the each of the basic patterns and browse part three about customizing and stylizing.

August 2012: Basic skirt pattern

September 2012: Skirt variation, either from the book or of my own design.

October 2012: Basic T

November 2012: T variation, either from the book or of my own design.

December 2012: Basic woven shirt

January 2013: Woven shirt variation, either from the book or of my own design.

February 2013: Basic dress

March 2013: Dress variation, either from the book or of my own design.

April 2013: Basic pant

May 2013: Pant variation, either from the book or of my own design.

Anyone interested in joining me? I would love to exchange ideas with others engaged in the same study and see what others create. No one is obligated to follow along for every single month (maybe you don't wear woven tops and you're not a skirt woman, that's cool). Or perhaps you just want to do the basic patterns. Check out this Flickr group for inspiration! Comment below and leave your blog address or Flickr ID if you want to work alongside me.

Friday, June 15, 2012

Summer PJs

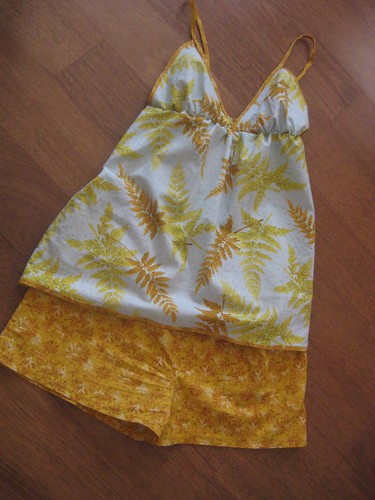
I bought the original One Yard Wonders as soon as it came out and regularly combed through the patterns for the ones that I wanted to make. However, until recently I had not made a single pattern. Earlier this year I made two versions of the yoga mat bag--one mostly as written (including the erroneous instruction for the base to be 16.5 inches in diameter) and one with a few changes (a pocket, placement of the strap). In planning my next projects I came across the 101 One Yard Wonders Sew Along at Pink Chalk Studios, which made me look at some of the patterns differently and offered insight into the projects. I liked the idea of the Perfect Fit Sleep Shorts paired with the Summer Nightie since I am more of a shorts sleeper than a nightie sleeper.

The instructions for drafting the shorts are fairly straight-forward, although I was not 100% sure what the rise was (the distance from the waist to the crotch seam--different on the front and the back) or if I was measuring it correctly. The resulting pattern is a little boxy, but it works. It would have worked better if I had paid more attention when laying out the pattern pieces as I ended up with two of the same front pieces instead of mirror images. This problem was compounded when I assumed I had cut the back piece incorrectly and corrected that piece by adding on the crotch piece. Then when I sewed my leg together I ended up with two of the same legs! To fix that problem I sewed the legs together with the crotch seam not aligned and adjusted to make the pieces even out. The result looks and fits fine, but it could be better. I sewed a little button on the front so I would know which side I intended to be the front.

Next time I will add a curve to the back pieces for a better fit and lower the waist as I typically don't wear my PJs at my natural waist.

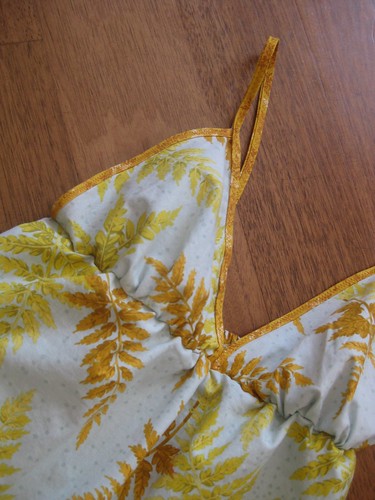
Using a coordinating fabric I then made the Summer Nightie using fabric from the shorts as bias tape. This came out super cute and I didn't have too many problems following the directions for drafting the skirt of the nightie. A couple of words of advice:
  • If you are going to wear this as a nightie, you might want to add a few inches to the bottom. You may not be able to do this with one yard so consider using coordinating fabrics or using a larger piece of fabric from your stash.
  • The triangles for the top are pretty small. I am a B cup, maybe a B+, and I cut out the largest size. It works, but next time I might make the triangles a bit bigger. Size up! If you are bustier, you can easily trace the triangles larger.
  • The casing instructions are fiddly. I would recommend either making the casing first, then sewing the triangles to the top or sizing the front down to fit your underbust size and shirring the back.
I plan on using the shorts pattern as a basis for making full-length PJ bottoms with the above adjustments. If I make the nightie again I might actually make it shorter to make it more of a top.

Wednesday, June 13, 2012

Wiksten squared

There's been radio silence the past few weeks as the school year has wound down, but my sewing machine has continued to hum. At the end of every year, when the testing is done, the art history class holds an event dubbed the Art History Olympics, a contest of intellectual prowess and artistic interpretation. Among the competitions are building famous pieces of architecture from memory using graham crackers, marshmallows, and cruciferous vegetables; The Price is Right with recently sold famous works of art; and an art fashion show where students act out pieces of art.

As I have been joining an esteemed panel of judges (other teachers) for a few years now, I decided this year I would join in with an art themed outfit. Since I had been obsessed with Jay McCarroll's Drop Cloth fabric from his Habitat line and stalking the Wiksten tank obsessively, I thought I would combine the two. I decided this with less than a week to make the top and I knew that I would have to, for the first time in my sewing life, make a muslin.

Armed with the knowledge mined from Flickr, I knew to cut out the size that matched my bust so I cut out the medium size using a recycled sheet (this sheet is endless, yo, I cannot get rid of this fabric). The initial result looked good, but needed some tweaking. I went and paid a visit to A Verb for Keeping Warm, where Kristine suggested that I take up the straps so that the seam fell behind my ears and for the excess fabric I was getting on the back neck I should take the back down a smidge. AVFKW had the Drop Cloth fabric in blue, which is exactly what I wanted, so I got 1.75 yards.

I got home, took up the straps and lowered the back. I liked it better, so I bound the neck as practice. One other thing that bothered me was how it sat on my backside. It sort of rode up, so I wanted to widen the bottom a little. I then transferred the following alterations to the pattern and redrafted it:
  • Trim .5 inch off front strap
  • Trim 1 inch off back strap & neck
  • Grade back down another .5 at deepest
  • Increase back sides by .5 inches starting at 7 inches from the bottom
  • Cut neck and armhole binding down by 1.5 
I cut out the pattern pieces on Monday night, sewed Tuesday night and early Wednesday morning et voila! I had something to wear to the Art History Olympics and a wearable muslin. 

I did end up cutting the neck down a smidge more, which is useful information since I just cut out fabric for a third Wiksten that will have a button band down the back and have two pockets on the bottom of the tank instead of one at the top. While this pattern seems simple, it is a great base to start from and a perfect pattern to practice making alterations with. I also think it could be a great gift if you have the general idea what size someone is especially since it works up super fast!